So You Think You're Crafty


In August I was contacted to participate in a crafty blogger competition - So You Think You're Crafty.  After hearing the idea, I thought, yes!  That sounds awesome.  And then I saw the list of competitors and might have peed my pants.

So ... all (extreme) nervousness aside, please check out So You Think You're Crafty!  The first round starts Monday.  Each crafter anonymously submits a project of her choice based on a weekly theme, and then the public votes for their favorite.  The winner of each week will provide a tutorial for their craft and the person with the least number of votes gets the boot.

I'm excited, really nervous, and mostly am just crossing my fingers that I'm not the first to go.  Wish me luck (and VOTE)!

Halloween 2009

This year for Halloween, Oscar is going to be an Eastern Bluebird.  I thought it was appropriate for him, since he will probably be my only east coast babe.  And of course, because he looks so darn handsome in blue.


The template and instructions for this costume can all be found at marthastewart.com.

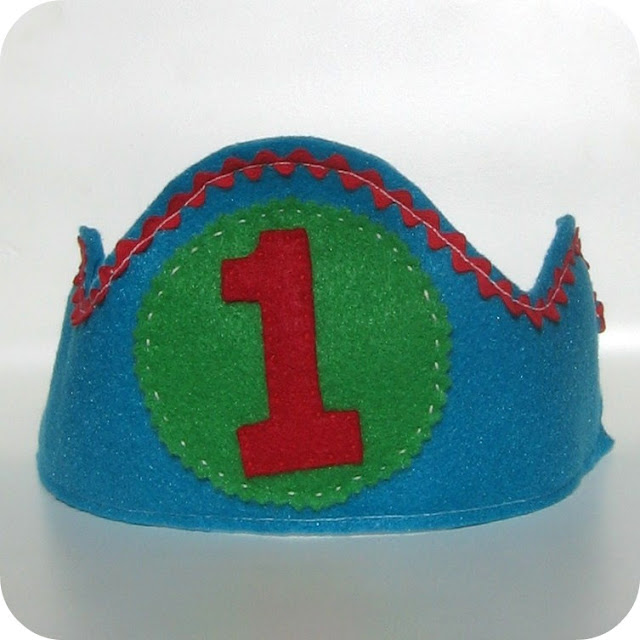
Lickety-Split Birthday Crown


Need a last-minute birthday crown?  The one Oscar is wearing took 5 steps and  less than 30 minutes to make.

Supplies:
  • two paper-sized sheets of felt
  • approximately 8 inches of elastic (depending on the size of your child's head)
  • the usual sewing supplies.
Instructions:
  1. Using the template below, cut two crown pieces, one circle, and the number of your choice.
  2. Sew the birthday number to the circle piece.  I cut out my circle with pinking shears for a little extra interest.
  3. Sew your now-numbered circle to the center wave of the crown.  Add any other embellishments you'd like - ric rac, ribbon, trim, etc.
  4. Lay your two crown pieces together, right sides out.  Sandwich one end of the elastic between the crown pieces and sew in place.  Repeat on the other side.  Make sure your elastic is not twisted.
  5. Sew around the entire outer edge, and you're done!  Time to party.


post signature

felt playhouse Q&A (and a mailbox template)

I am overwhelmed by the response I'm getting from the playhouse.  Thank you so much!  I am really pleased with how it turned out, and it is always fun when other people love it, too.  So thanks again!

Here's one last template. Everything else on the playhouse is either a really basic shape that should be easy for you to cut on your own, or is just too big to do a template for.

I've been getting tons of the same questions in the comments.  Rather than make you read through them all, I thought I'd round them all up in a post.

1.  Did you think of this idea yourself?  No way!  I'm not quite that clever.  The first fabric playhouse I ever saw was on Nothing Fancy, who made the sweetest little playhouse out of a duvet cover and twin sheet set.  Then I saw an awesome playhouse at This and That, which won me over big time because it is full of cuteness on the inside too (I so did not take the time to line mine and decorate the inside ... but I do have some future plans).  This and That's SIL, Sew Much Ado, also made a fun all-boy playhouse (with a tutorial!) and linked over to Imaginative Play Toys on Etsy.  That's when I knew, I wanted to make an all-felt house.  So, no - the felt playhouse itself was not my idea, but I think all of the decorations and embellishments are pretty unique.  I tried to make it one of a kind.

2.  How do you hang it/make it stand up?  The playhouse is essentially a slipcover made to fit my kitchen table.  Kind of like a tablecloth with sides?  The top is a big rectangle of felt.  I sewed the side pieces to the top piece, and then I sewed the side edges together.  Presto-chango-playhouse!

3.  What are the playhouse's dimensions?  It is 48 inches wide, 30 inches tall and 36 inches deep.  When I was cutting my side pieces I added an inch to all of the dimensions for seam allowance.  However, this is made to fit my kitchen table.  So whether you are making a playhouse to fit your own kitchen table, a folding card table, or a stand you make yourself, please use your own measurements!

4.  Where did you buy your felt?  How much felt do you need to make it?  How much did it cost? What exactly did you order (colors and amounts)?  I bought my felt by the yard at Fabric.com.    Here is my exact order:  3.5 yards Rainbow Felt Peacock, 1.5 yards Rainbow Felt White, 1 yard Rainbow Felt Orange, .5 yard Rainbow Felt Walnut Brown, .5 yard Rainbow Felt Yellow, .5 yard Rainbow Felt Cashmere Tan.  I have a mountain of leftover felt, so you really don't need this much.  But I don't mind, because I LOVE having lots of felt on hand.  I know I reference Fabric.com a lot around here, but I've just had a great experience with them.  They have free shipping for orders over $35, and there is usually a coupon code floating around the internet.   In my felt order the accidentally forgot to include the white felt, so they over-nighted the missing fabric.  Now that's what I call service!  (and no, I am not affilliated with fabric.com in any way).  My order, taking advantage of a coupon code and free shipping, only cost $26.

5.  Why did you use felt, as opposed to cotton or another fabric?  I wanted my entire playhouse to be made out of the same material.  And I didn't want to spend forever finishing seams or appliqueing on details.  Felt was a good choice for me because I didn't have to finish any seams (yay!) and I could just sew (not applique) all the decorations directly to the playhouse walls.   Felt is not the best choice if you expect to wash your playhouse frequently. 

6.  Do you sell these?  A big no to this one.  I'm not going to lie ... this project was a ton of work.  Unless someone I love very much asks me to make one for them, I don't see this being a repeat project for me.  Good news is, you can get a beautiful custom playhouse at Imaginative Play Toys (an etsy shop).  She makes over two dozen different designs!

7.  Was it hard to sew together (since it is so large)?  It really wasn't very hard to sew together, despite all that fabric.  As long as you add all of your embellishments before sewing the sides together, you should be fine.  I added mesh to the window panes after it was all put together, and that was a serious pain in the neck.  Embellish first, assemble second!

Great ideas that came through the comments:

From Prairie Girl - "Wouldn't it be cute to make velcro Christmas lights to "hang" around the roof or on the tree. Or how about a snowman to "build" on the side of the house."  Yes, velcro Christmas lights are about the cutest thing I've ever heard of.

Someone else suggested (and I can't remember who - I couldn't find the comment.  sorry!) that I could build a frame for the house using PVC pipe.  Great idea!  This is definitely something to consider when we get a different kitchen table.

post signature

flower, fruit and vegetable templates

Happy Friday!  To use the following templates from my felt playhouse, right click on the images to save and print as a full 8.5x11 sheet of paper.  enjoy  :)

 
Flower instructions:
  • Cut two of each flower.
  • Cut one center for each (except tulip).
  • Embellish the front of the flower with a felt center, button, etc.  Set aside.
  • Sew a tube of green felt for the stem.  Insert a pipe cleaner for added stability.  I folded my pipe cleaners in half and twisted the ends together to keep them from ripping through.
  • Sandwich 1/2 inch of stem between the two pieces of flower.
  • Sew around the outside edge, leaving an opening for stuffing.
  • Stuff flower with polyfill.
  • Sew the opening closed.


Can I get away with not posting full instructions for all of the produce?  In brief - for each item, cut two.  Attach a square of velcro to the back piece if you want it to stick to the playhouse.  With both pieces together, sew around the outer edge, leaving an opening for stuffing.  Stuff with polyfill.  Sew the opening closed.  For apple and carrot, insert stem (use a 3 inch piece of ribbon or trim (folded in half) for the apple) before sewing the opening closed.  Easy, peasy!

For the corn, cut strips of white and yellow felt and weave into a rectangle, slightly larger than the template.  Cut two additional yellow corn pieces using the template.  Sew one solid yellow piece to the woven rectangle, going around the outer edge.  Trim off excess woven pieces.  Layer your woven corn piece with the other yellow corn piece and sew around the outside, leaving an opening for stuffing.  Stuff with polyfill and sew opening closed.
 
post signature

felt playhouse

I'm so excited to finally post this project!  Welcome to apartment 9 ...

 
So far, these flowers in the window box are Oscar's absolute favorite.  They last about 2 seconds in the box before he has plucked them all, and then drags them around all day.  The stems have a pipe cleaner in them to give them support, and as a bonus, makes them satisfyingly bendy.

A close second favorite for Oscar is passing items through the mailbox.  In, out, in, out ... he could do it all day long.
 
Woof, woof.  We are not really dogs-in-the-house kind of people, but we love seeing them when we go on walks.  I think this faux-Sharkey makes the perfect pet. 
 
I enlarged and modified this french bulldog template on marthastewart.com to make the little guy.
 
 
The animals on this side of the house were also made with borrowed templates.  The squirrel is from matsutake, and the owl is my interpretation of the Petit Collage template on marthastewart.com.

I added this mesh (formerly a laundry bag) to the windows over the weekend after Oscar made repeated attempts to jump through the window panes.  So for those of you interested in making one of these yourself, consider either making the windows small or adding some kind of mesh/vinyl/etc.  I almost did clear vinyl, but I wanted to keep the air flowing inside.  A felt house can get stuffy!

 
Apple picking time!  I tried to make this tree look pretty similar to the one found in Oscar's quiet book.  He has been enjoying picking apples and can even put them back on the tree.  I think I'm going to make lemons for the tree for a little variety. 
 
On the back of the house, you'll find a big garden, ripe for harvest.  The soil has many pockets to fill with veggies (with room to grow as I make more).

 
I think the corn on the cob is my favorite part.  It was my brilliant basket-weaving mom's idea to weave the  white and yellow felt together for the corn cob.  Too cute!  It slides easily in and out of the husk.


Hungry for a BLT?  We have lettuce ripe for picking.

I could probably write up a month of posts on this playhouse, but I'll try to stick with just a few more. 

UPDATE:  I have posted some playhouse templates here and here.  See the felt playhouse Q&A post for frequently asked questions on the playhouse.  Thanks!


post signature

all partied out


After a week of cake, streamers, parties, more cake ... we are all partied out! Oscar is a one-year-old big boy, and I can't believe how fast he is growing up.

The playhouse was finished just in the nick of time. After a weekend of serious play, I am giving it a few tweaks. LOTS to come on the playhouse. :)


post signature

three more quiet book pages

Another quiet book ... DONE! Well, I still have to make a quick cover, but that won't take any time at all. So, without further ado, here are the last three pages.

First, a little something for Halloween:


boo! I love the friendly ghost.

Then, a bit of circus animal fun:

The balloon has a squeaker inside. Yes, I know that is not exactly quiet. But it is FUN!

My mom is in town for Oscar's birthday and helped me crank out these last two pages. She did all the little french knots for the popcorn. Doesn't it look delicious?


Serious progress was made on the playhouse today. So excited!

post signature

let the celebration(s) begin!

Saturday we hit off Oscar's "birth week" (because apparently he takes after his mom and likes to drag out the celebrations as long as possible) with a playgroup birthday party. All the babies in our playgroup were born within about two months of each other, which, in addition to making it super fun, gave us a great excuse for a big group party.

I made a number one cake, taking inspiration from the B cake on Blonde Designs Blog. I made mine two layers and spread a delicious raspberry filling in the middle:

Get the raspberry filling recipe here.

I also made mini carrot cake cupcakes for the babies:

The big polka dot sprinkles are from Layer Cake Shop (which I love!).

Party number two (grandpa's special party) is scheduled for tonight. Woo!

post signature

Audrey's quiet book

Remember how I'm supposed to be sewing a playhouse? I am nothing if not easily distracted.

My new friend Sonja is about to embark on a super long plane ride with her almost one year old daughter. Squirm city. We were talking about Oscar's quiet book, and I decided it would be a good idea to make one for their trip. Sonja came over and once I taught her the blanket stitch, there was no stopping us. Here's what we've got so far:


Is it totally sad that I might like this one better than Oscars? I'll have to add new pages to his book!

Also, I would love to provide templates for these pages, but I am under a major time crunch right now. I'll have them up in the nearest future that I can manage. :)

post signature

Popular Posts

Followers