homemade t-shirt

Using one of my favorite t-shirts as a pattern, I sewed this tee up from scratch. It was experimental slap-dash sewing, but is surprisingly wearable and a good fit. I learned a few things that will help me in round two.

Let me know if you are interested in a tutorial for this one, and I'll take pictures of my next shirt in progress.

post signature

Color and Scheme Giveaway (closed)

I've got a spectacular giveaway for you today, particularly if your living room is in desperate need of a spruce.

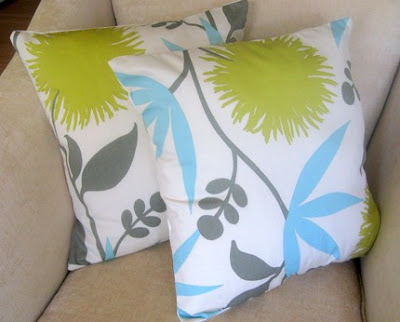
Meet Color and Scheme. Sariah, owner of this cheery etsy store, got started just this past May. It all began with a plan to redecorate her living room inexpensively. Her search for colorful curtains and throw pillows brought her to Etsy, and then extended to every online fabric store she could find. Sariah had so much fun that she decided to open up shop, and Color and Scheme was born.

I've never met Sariah in person, but she is a good friend of one of my very best friends, so I know she's good people. :) I have, however, met her pillow covers, and they are fresh and lovely and make my boring brown couch say, "how you doin'?" a la Joey Tribbiani.

My favorite part about Color and Scheme is the fabric selection - there are so many gorgeous prints I have never seen before. Here are some of my favorites:

Light Blue Bird and Floral Print

Yellow and Blue Dandelion Burst

Serafina Floral Print

Color and Scheme's goal is to bring unique fabrics to Etsy and help others with their decorating projects. Throw pillow covers are an affordable way to change the look of a room with a little color. If you are a color-lover too, this is an easy (and affordable) way to change your decor to fit your mood, the season, or the current trend.

Color and Scheme is generously offering the winner of this giveaway a pillow cover set (2) of their choice! You heard me ... two pillow covers. In your favorite fabric (good luck choosing).

Be sure to check out the Color and Scheme Blog to see custom orders and a preview of upcoming fabric choices.

What is your favorite fabric choice from Color and Scheme?

This giveaway is now closed. Thanks for entering!

post signature

making baby pants

Dana at made makes hands-down the cutest baby/kids clothes. And she is nice enough to share tutorials, too! This weekend I used her knee pad pants tutorial to make these pants for Oscar:


I left off the knee pads (this time) and added back pockets and front porkchop pockets. I have a bit to learn about pocket placement, but they are definitely wearable.

I like how she shows you how to draft a pattern from a pair of pants you already own. I think I'll try this method on a t-shirt (for me) next.

post signature

guest blogging at UCreate

Happy Friday! Today I am a guest blogger at UCreate. Hop on over to check out my new tutorial on making a custom silhouette pillow.

post signature

printables II

My bookmarked printables are getting unruly again, so I thought I'd share a few with you. Here are some of my favorite free printables from around the wonderful web. Enjoy!

Perfect for Parties

Cupcake Box template by IS*LY

Elephant Baby Shower cupcake toppers, bunting and invites at Alpha+Mom

EVERYTHING in the new DIY section of Martha Stewart Weddings

Favor Boxes by Twig and Thistle (via Style Me Pretty)

Placecards by Heirloom Paperie

Fill-in-the-Blank Invitation by The Small Object


Just for Fun

Dreamy Projects to Post List by Erin Vale Design

Be Kind Banner by kind over matter

Teeny Envelope by Cottage Industrialist

I Can Do Hard Things to-do list by Heirloom Paperie


Greeting Cards

Miss You Love You card by Erin Vale Design

Penelope's Would be Party Invitation by IS*LY

Thank You card by Cottage Industrialist

Thank You card by Inspired Designs by Faith

Thank You card by Heirloom Paperie

Procrastinate Now and Panic Later card by Creature Comforts


Gift Tags

Summer Gift Tags by Erin Vale Design

Cupcake Tags by Creature Comforts


You can find my first round of favorite printables here.

And just to spice up this post, here is a healthy dose of some big blue eyes.


post signature

baby booties for craft hope

Last night I sewed up a bunch of baby booties for Craft Hope using this kimono baby shoes pattern from a very lovely blog called HomeSpun Threads.


(this last pair is my favorite)

Now I'm off to the post office!

post signature

craft hope


Have you heard about Craft Hope? This is why I love the internet.

Founder Jade Simmons is uniting the crafting community to bring handmade items to those less fortunate. Project 3 is well underway, but there is still time to donate if you act quickly. The deadline is this Saturday, July 25.

This weekend I made 22 baby beanies to send to the orphanages in India. They are super simple jersey hats, but I hope they bring a bit of comfort to those sweet babies.

I'm planning to whip up a couple pairs of booties tonight to add to the package.

I can't wait to see what project 4 will be!

post signature

Bubby's giveaway winner


Congratulations, Ashley, of South Meets South! You are the winner of the Bubby's Peace Sign Onesie.

Please email your contact info to homemadebyjill@gmail.com and I'll put you in touch with Jessie Rivers. Also, congrats on your big news!

post signature

recycled baby food jars

Baby food jars are just too cute to throw in the recycling bin. I'm using some of mine for color-coordinated button storage, but I'd like to think of more uses.

It would be cute to fill the taller 6oz baby food jars with homemade lemon curd for holiday gifts. With a festive label and some ribbon, they would be a perfect little item to have on hand.

Oscar loves to play with the baby food jar lids. To make them a more interesting, I put some simple pictures inside. When he's older we can make it a matching game.


Would you like to play, too? Click here for the .pdf.Print two copies on cardstock or photo paper, cut out the circles, and press into the inside of (clean) baby food jar lids. It is a tight enough fit that no glue is required. For an older child, though, you could paint the lids a pretty color and glue the images to the inside for a longer lasting (and cuter) game.


post signature

p.s. last chance to enter the Bubby's Giveaway! Get your comment in by midnight tonight.

the boy who crafted

I hope you are all planning to see Harry Potter today (if you have not already). I made Oscar some felt Harry Potter glasses in celebration ... and if you cannot tell from the photo, they are wildly unpopular.

You can find lots of fun Harry Potter crafts here (I especially like the wands).

I'm not the type to dress in costume to go see a movie, but I did go to a Deathly Hallows release party as Hagrid a few years ago. All my friends were dressed up too, and people barely batted an eye at our group down in the subway. And that's why I loved NYC.

post signature

Bubby's Appliqued Onesie Giveaway (closed)

It's my pleasure to introduce you to Bubby's, a fantastic mom-run etsy shop.

The idea for Bubby's came to Jessie Rivers after her son's birth. When she noticed that the variety of clothing was much greater for girls than boys, she started appliqueing shirts for him. Then she started making baby gifts for friends ... you see where this is going?

Bubby's is truly a family effort for the Rivers'. Dad comes up with great ideas and color combinations, mom is the meticulous sewer, and baby is the inspiration/cutest model in the world.

Jessie's goal with Bubby's is to provide unique and fresh designs ... at a reasonable price. She says, "I am always aware that no matter how cute, a shirt or onesie will only be worn for about three months." (I'm glad someone realizes that!)

I just have one thing to say about Jessie's shop - her applique designs are clever. She just has some really original designs. For example, I love how she incorporates the negative space into this inquisitive panda shirt:


And we've all seen the necktie onesies all over the internet. But a necktie and vest? Or a necktie and suspenders? Cute, cute, cute.


All of the colored shirts are hand-dyed. The appliques are fused with interfacing and edge stitched. Everything is machine washable.

For those of you living in the NYC metro region (lucky!), items from Bubby's will be soon be available at Itty Bitties, a children's boutique in Hoboken, NJ.

So, here comes the giveaway ... one lucky winner will receive a Peace Sign Onesie (pictured above) in your choice of size and color combo (boy or girl).

What is your favorite Bubby's applique?

This giveaway is now closed. Thanks for entering!

post signature

on becoming a cobbler

In a sudden fit of productivity Friday night, I made four pairs of baby shoes (this is what happens when you move to a new town, have no friends, and your husband is studying for the bar exam).

First up, these:
Very much inspired by this Flickr set - the most beautiful baby shoes I have ever laid eyes on. They were meant for a boy, but ended up quite girlie.

So I made a replacement pair, using the ever-reliable Stardust Shoes pattern:


And then I decided Oscar needed a pair:

And while I was at it, I thought I may as well make another pair to have on hand in case I ever have friends again (do I sound lonely yet?) and get to go to a baby shower:

Shoes ... love making them. On a scale of 1 to 10, how tacky would it be to make these in a womens size 8 1/2? Because I think they look comfy.

post signature

baby crafts

One of my favorite sites for baby crafts is Make It and Love It. Ashley has some really great ideas and has posted a lot of tutorials. When Oscar started teething a few months ago, I made cloth baby rings using this tutorial. They were a hit (still are).

Now that we are in suburbia and drive a car (bleh), Oscar spends a lot more time in his car seat. The straps leave angry red marks on his neck, so I used Ashley's seat belt cover tutorial to make these:

Ahh, much better. So my point is, check out Make It and Love It. Great stuff.

The measurements in Make It and Love It's tutorial are for a jogging stroller. If you are making yours for car seat straps, consider making them short, or adding button holes like I did.

shirt to dress refashion

I love to find a good bargain. The only person I know who loves to bargain shop more than me is my beloved friend Megan. She once wore a 76 cent clearance skirt (76 cents!!!) to a church activity, and forgot to take the price tag off. It was embarrassing and awesome. But that is a story for another day.

Last week I was in Macy's, scouring the clearance rack, when I found this shirt (p.s. sorry about the dark photos ... I craft at night!):

The top part was cute, but the never-ending bottom was problematic. It came down to like mid-thigh. Stacy and Clinton would not approve. However, it was exactly what I was looking for, because I was feeling inspired by the incredibly talented Alexis of My Mama Made It. Have you seen her blog? I love it. Especially the very last dress in this post.

With my partially cute bargain shirt on hand, I was ready for a little experiment, which resulted in this:


Here's how to do it. First, I got out my trusty seam ripper and carefully removed the bottom half of the shirt from the empire waistband.

Then I took the side seams out of the bottom of the shirt, and unpicked the pleats from the front and the darts from the back. I didn't iron them out though, because I wanted to recreate them on my skirt.

I laid the front piece of the shirt on top of my skirt material and cut it to the same size, only I extended the length . I cut mine to 27 inches long. You want the top of the skirt to be the same width so it will fit back in the shirt waistband. Do the same thing with the back piece of fabric.

Next I recreated the pleats in front and the darts in back. I didn't really measure ... just folded and pinned my skirt fabric in the same places the shirt had pleats/darts.


I forgot to take pictures at this point, but here's where the sewing started.
  1. Sew across the top of the front skirt piece to hold the pleats in place, and then sew up the darts in the back.
  2. Attach the front and back skirt pieces to the waistband (just slide them right back inside the waistband and top-stitch it closed).
  3. Sew the side seams along both sides of the skirt
  4. Try on the dress and pin the hem to your liking. Using the blindest blind stitch you can muster, hem the skirt. (I have little patience for hand-sewing.)
And that's it! It was a pretty easy project, and took me about 3 hours total.

I was nervous about the bright orange fabric, but now I love it. Gives the dress a little zing, don't you think?

post signature

Popular Posts

Followers