Crocheted food - yum
The only thing better than felt food is crocheted food. I found an excellent pattern for crocheted cupcakes at BitterSweet (what an amazing blog - she is a crochet genius). From there, I just made the patterns up myself.


Felt Food toys
I have a new craft obsession - felt food. It is so fast, so fun, so easy to make. I just sent a bag of "groceries" to my niece for her second birthday (a perfect compliment to her first kitchen from grandma). Most of these ideas are shamefully copied from the toys at Mahar Dry Goods (sorry). Imitation is the sincerest form of flattery, right?


The grocery sack - I sewed it out of those sheets of fun foam you can find at the craft store. Peeking out of the bag is the ravioli (I made a label out of full-sheet label paper and stuck it to a glad ware container) and a loaf of bread (which I forgot to photograph).
They should start a 12-step program for people like me. Hello, my name is Jill and I am addicted to making felt food.

Pancakes, bacon, a fried egg and a strawberry

The insides of a bologna and cheese sandwich with lettuce and tomato


pizza with pepperoni, mushrooms, green peppers and black olives

cheese ravioli with marinara sauce

Chicken dinner - a drumstick, mashed potatoes, pea pods and a slice of pumpkin pie

another shot of the pumpkin pie - I added a dollop of whipped cream

The grocery sack - I sewed it out of those sheets of fun foam you can find at the craft store. Peeking out of the bag is the ravioli (I made a label out of full-sheet label paper and stuck it to a glad ware container) and a loaf of bread (which I forgot to photograph).
They should start a 12-step program for people like me. Hello, my name is Jill and I am addicted to making felt food.
Labels:
felt,
play food,
sewing for kids
Dishtowel Aprons
I made these two aprons using the dishtowel apron tutorial over at I Have to Say. Such a great idea! For this first apron, I actually used half a dishtowel (it was for my 2-year old niece).
I also have been itching to try out embroidery, and luckily came across a 5 week lesson series at Crafty Daisies. For this project, I just used the backstitch (which turned out to be quite simple) and I am excited to learn others.


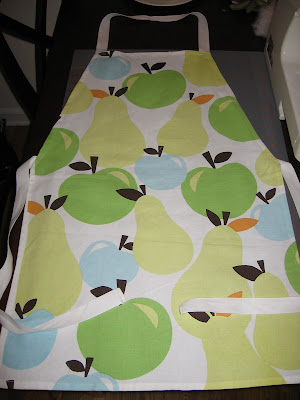
I was having a difficult time at the store deciding between prints, so I bought two (the polka dots above and the apples/pears below). The apple/pear towel turned out to be so large that I thought it would be a quick and easy project for myself - a new apron in about 15 minutes! You can't beat that.

I also have been itching to try out embroidery, and luckily came across a 5 week lesson series at Crafty Daisies. For this project, I just used the backstitch (which turned out to be quite simple) and I am excited to learn others.


I was having a difficult time at the store deciding between prints, so I bought two (the polka dots above and the apples/pears below). The apple/pear towel turned out to be so large that I thought it would be a quick and easy project for myself - a new apron in about 15 minutes! You can't beat that.

Labels:
embroidery,
sewing for kids
Missouri sugar cookies
Sometimes I miss my home state of Missouri, and so does my best St. Louis pal, Megan, who recently moved to NY. Its times like these when I am forced to make Missouri sugar cookies.

I love this cookie cutter. I found it at Off the Beaten Path (which just so happens to be located in the fine state of MO). Megan thinks I should get one of each state and make a cookie map of the U.S. While that certainly would be cute, I just don't think I have a strong enough attachment to each other state to store their cookie cutters in my small kitchen. At some point I'll order a California and New York, and maybe just for old time's sake, a Utah.

I love this cookie cutter. I found it at Off the Beaten Path (which just so happens to be located in the fine state of MO). Megan thinks I should get one of each state and make a cookie map of the U.S. While that certainly would be cute, I just don't think I have a strong enough attachment to each other state to store their cookie cutters in my small kitchen. At some point I'll order a California and New York, and maybe just for old time's sake, a Utah.
Teapot Sugar Cookies
One last post about this last baby shower and then I swear I'm done. I just wanted to post a few pictures of the teapot cookies because they were so cute. It was difficult to come up with designs for these because I am not good enough with the frosting tips to make them too intricate, but I didn't want them to be boring either. I settled on these four designs:

The polka dots and flowers were my favorites. I picked up a couple new cookie cutters while buying supplies for these as well as a giant frosting tip for cupcakes - can't wait to use them!

The polka dots and flowers were my favorites. I picked up a couple new cookie cutters while buying supplies for these as well as a giant frosting tip for cupcakes - can't wait to use them!
Labels:
baby shower,
baking,
cookies
Two Crocheted Baby Blankets
I made these two blankets for my friend at work having twins. The first is a very pale pink blanket, made with a terrycloth yarn. Very simple - I just used a single crochet with three rows of double crochet for the edge. I really loved how soft and cuddly this little blanket was. I accidentally threw away the yarn packaging, but I think it was just Red Heart Baby Terry (also, it is machine wash and dryable - always a plus).
 The second blanket was lavender with a white satin ribbon trim. I used the basket weave stitch, which is quickly becoming my favorite stitch for blankets. It makes them nice and thick, and the texture is quite pretty.


 The second blanket was lavender with a white satin ribbon trim. I used the basket weave stitch, which is quickly becoming my favorite stitch for blankets. It makes them nice and thick, and the texture is quite pretty.


Labels:
crochet
Homemade Paper Roses
I'm not making a tutorial for the paper roses because you can find a great one online at Martha Stewart. She even includes a video! I would highly recommend watching it once or twice before attempting this.
You will need very few supplies: coffee filters, sharp scissors, floral wire, floral tape, and watercolors (I used the super cheap $1.99 kind and they worked very well).
Here are some photos of the process - go to the tutorial for the step by step instructions, and if you get a chance, also check out www.mommymakesroses.com to see the original artist's work. Her roses are gorgeous!


This was a surprisingly easy project. It took me three tries to get it right, so I just have a few recommendations:
1. If possible, buy the flat coffee filters like the ones shown on Martha's video (not the kind that I had with the rippled edge). They will work the same in the end, but I ironed mine flat so they wouldn't be wrinkly
2. Be generous with the floral tape, and make sure on the first few layers that you tape down the floral wire at least an inch, and tightly. Otherwise, when you go to fan out the petals, all your layers will slide off the stem (attempt 1)
3. As you add each layer of petals, the tips should be slightly higher than the layer below. If you place them lower, the center of the rose will poke out high in the middle and it just doesn't look right (attempt 2)
4. I used tons of water with the paints to really dilute it. The rose is going to be totally soaked by the time you finish painting it. Use less water to color the tips for a stronger hue. It is okay that the petals stick together a bit - they'll come apart again when it dries.
I hope some of you try this out. I had a great time making them and will definitely make more. The most time-consuming part is just tracing and cutting out the petals. Building the rose is actually a pretty quick process.
Well, I'm off to get my wisdom teeth pulled. eek - I am so nervous.
You will need very few supplies: coffee filters, sharp scissors, floral wire, floral tape, and watercolors (I used the super cheap $1.99 kind and they worked very well).
Here are some photos of the process - go to the tutorial for the step by step instructions, and if you get a chance, also check out www.mommymakesroses.com to see the original artist's work. Her roses are gorgeous!


This was a surprisingly easy project. It took me three tries to get it right, so I just have a few recommendations:
1. If possible, buy the flat coffee filters like the ones shown on Martha's video (not the kind that I had with the rippled edge). They will work the same in the end, but I ironed mine flat so they wouldn't be wrinkly
2. Be generous with the floral tape, and make sure on the first few layers that you tape down the floral wire at least an inch, and tightly. Otherwise, when you go to fan out the petals, all your layers will slide off the stem (attempt 1)
3. As you add each layer of petals, the tips should be slightly higher than the layer below. If you place them lower, the center of the rose will poke out high in the middle and it just doesn't look right (attempt 2)
4. I used tons of water with the paints to really dilute it. The rose is going to be totally soaked by the time you finish painting it. Use less water to color the tips for a stronger hue. It is okay that the petals stick together a bit - they'll come apart again when it dries.
I hope some of you try this out. I had a great time making them and will definitely make more. The most time-consuming part is just tracing and cutting out the petals. Building the rose is actually a pretty quick process.
Well, I'm off to get my wisdom teeth pulled. eek - I am so nervous.
Labels:
crafts,
Martha Stewart,
paper crafts
Diaper Cake Tutorial

UPDATE: check out my most recent diaper cake for some optional revisions to supplies and instructions.
I. Supplies Needed:

One large telescoping mailing tube (mine was 4 inches in diameter). I found mine at The Container Store.
You'll also need:
- a large piece of cardboard
- white butcher paper or wrapping paper
- doilies
- 2 bags clear rubber hair bands (think Goody) - about 100 bands
- large rubber bands, preferably white (I also found these at the container store - Can Bandz)
- a strong cardboard wrapping paper tube
- 2 packs of good-quality diapers, preferably plain white
- ribbon
- decorative paper
- safety pins
- a hot glue gun
- tape
- rubber cement
- sharp scissors
- flowers for decoration
First, roll all of your diapers. I bought one pack of pampers newborns (up to 10 lbs) and one pack of size one diapers (8-14 lbs) - approximately 45 diapers total. My friend is having twins, so I thought the smaller diapers would fit better. Roll the diapers with the pattern on the inside and secure around the middle with a clear rubber band. The open end of the diaper should be rolled to the inside.

 It will look like this. Continue until all the diapers are rolled and set aside.
II. The Diaper Cake Stand
Since I was planning to transport this diaper cake to work on the subway, I wanted it to be really sturdy. This method makes for a very solid cake.
1. Cut 3 large circles out of strong cardboard. For the largest tier, I traced a dinner plate. For the middle tier, I used a salad plate, and for the top tier, I traced a small bowl.

2. Trace each size again on white paper (I used wrapping paper so it had a nice shine). Cut the three circles out and glue (I used rubber cement) to the cardboard.

3. For a decorative edge, glue doilies around the circumference.

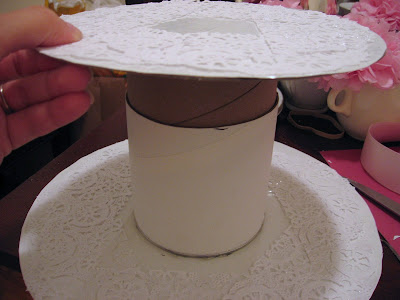
4. Now you are ready to start building the stand. First you will need to cut your mailing tube to the height of your rolled diapers. The larger sized diapers were about 4 inches tall when rolled, so I cut the outer (white) layer of the mailing tube to approximately 4 inches. Using a hot glue gun, glue the outer tube to the center of the decorative side of the lower tier.

5. Cut the inner (brown) tube to approximately 3-4 inches in length. Hot glue to the bottom (undecorated side) of the middle tier.


6. The middle tier will now slide into the bottom tier.

7. Repeat the process with the middle tier.

8. For the top tier, use a strong cardboard wrapping paper tube or something similar. Try to find a tube that does not easily bend (the inner tubes of saran wrap or reynolds wrap work well). Cut to the height of your smaller sized rolled diapers and hot glue it to the center of the decorated side of the top tier.

III. Adding the diapers
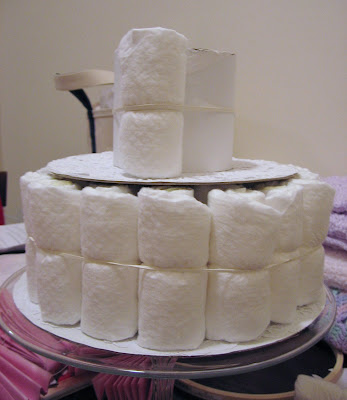
1. With the cake stand built, you are ready to start adding diapers. I disassembled my stand and added the diaper layers one tier at a time. Put the large rubber band around the mailing tube first, and it will secure the diapers as you add them. I used two layers of rolled diapers on the bottom tier.

2. The middle tier had a single row of rolled diapers.

3. The top tier also had a single row of rolled diapers.

4. I had extra diapers, so I put rolled diapers inside of the mailing tubes on the bottom and middle layers. This would also be a good place to hide other baby gifts (socks, receiving blankets, binkies, etc.) if you so choose. I also placed unrolled diapers around the mailing tubes to add few more. You can slide them into the middle there without removing the rolled layers.

III. Decoration
1. I taped green velum leaves to each of the cardboard bases to add a bit of interest to the edges

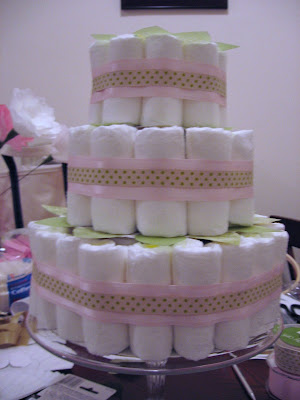
2. Use decorative ribbon to cover the rubberbands on each layer. I pinned one edge of the ribbon to the large white rubberband at the back of the diaper cake with a safety pin, so none of the diapers would be damaged. Then, I wrapped the ribbon around the diaper layer and overlapped it in the back, securing with hot glue (hopefully that makes sense). I love the look of double ribbon, but a single layer would do just as well.

3. Add a decorative cake topper. I used paper roses from a tutorial I saw at MarthaStewart.com. This trio of roses slid right into the opening of the wrapping paper tube in the top tier.

4. Place a few smaller flowers that match the topper on the lower layers. I just slid the wire stems in place under the cardboard base and used double sided tape on the bottom of the blossom to secure.

5. Sit back and enjoy all the oohs and ahhs at your baby shower.

Hopefully this tutorial was helpful! Sometimes I have a hard time putting crafty directions into words. This first-time diaper cake was a series of trial and error, but in the end had a great finished product. My favorite part of this diaper cake is that it is very sturdy, yet each of the tiers slide apart easily. It will easy for the mom-to-be to dissemble when it comes time to put those diapers to use, and the inner compartments are ideal for hiding additional gifts.
Enjoy!
Labels:
baby shower,
crafts,
tutorial
Subscribe to:
Comments (Atom)
Popular Posts
-
I think it is time to get back to our regularly scheduled crafting. Have you ever made your own books? I used to love to write and illustrat...
-
The Bella Twins (born on November 21, 1983) are a female professional wrestling tag team consisting of twin sisters Brie Bella (Brianna Ga...
-
HOT AUNTY BLOUSE BACK-MILKY WET BLOUSE -AUNTY BACK BLOUSE BACK HOT Posted on February 9th, 2011 by Admin ...
-
Hot Malayalam Bhabhi Aunty navel show and sari pictures. Malayalam Bhabhi Aunty Navel. malayalam bhabhi aunty navel sari photos. Malayalam b...
-
Here's a variation on the gift jar from my last post. For a different look (and more instant results), you can use Elmer's Painters...
-
Watch duds the perfect body of indian aunty or bhabi pictures. She appears alluring and voluptuous. This Auinty is in blue wet saree/sari. I...
-
Unbelievable Malayali Chechi Hot Aunties Red Saree Pictures. She is the heroine of Malayalam film as well as Bolly film. Watch red saree Mal...


